Django NGINX and Gunicorn
Django is an efficient, versatile and dynamically evolving web application development framework. Nowadays Django is becoming more powerful in designing web applications.
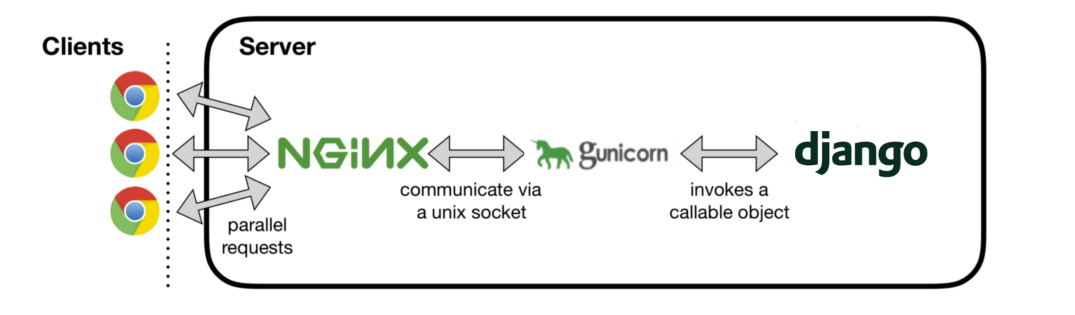
Running a local server of Django is not a recommended way in production because it’s just a test server not a production ready server. So to run Django in production is to run with Gunicorn and use Nginx as a reverse proxy so it gives more security to our application.

In this blog post I will explain to you how you can run your Django application in the Production environment. So Let’s get started.
Prerequisites:
- Amazon Ubntu(16.04) EC2 instance up and running with the associated key pair (ssh access to it).
- Port 22, 80, 8000 must be open for this instance.
SSH & update ubuntu instance:
You need to ssh into your EC2 instance, so make sure you have port 22 open for your instance and then do an update/upgrade.
ssh -i path-to-your-key.pem ubuntu@your-aws-instance-public-ipsudo apt-get update && sudo apt-get upgrade -y
Installing Python3.6.x on AWS EC2 (ubuntu 16.04):
We will download the tar.xz file from the official site and then manually install it. Before that we need to install some required dependencies.
- Building and installing dependencies
sudo apt install build-essential checkinstallsudo apt install libreadline-gplv2-dev libncursesw5-dev libssl-dev libsqlite3-dev tk-dev libgdbm-dev libc6-dev libbz2-dev libffi-dev
- Downloading & manually installing required Python version
cd /opt && sudo wget https://www.python.org/ftp/python/3.6.6/Python-3.6.6.tar.xzsudo tar -xvf Python-3.6.6.tar.xzcd Python-3.6.6/sudo ./configuresudo make && sudo make installcd /home/ubuntu/
- Check Python version
python3 -VCreate Sample Django Application:
- Create Directory for sample application
mkdir hello_django && cd hello_django- Create and activate virtual environment
python3.6 -m venv .source bin/activate
Your environment is now activated and you can proceed to install Django inside it.
pip install Django==3.0Your environment with Django should be ready to use. Go ahead and create an empty Django project.
django-admin.py startproject hello- Test Sample Application
You can test it by running the development server. You can ignore warnings.
cd hello/python manage.py runserver 0.0.0.0:8000
Go to your browser and hit <ec2-instance-dns:8000> you will get an error saying “DisallowedHost at /” to solve this error press crtl + c to close development server.
Go to hello/settings.py in ALLOWED_HOSTS add “*” in the list as shown in the image below.
Run your server again and you should see the Django power page.


Comments
Post a Comment